Showing posts with label gifts from the heart. Show all posts

gifts from the heart 2011, week two recap


what a fun two weeks we have had!  thanks for reading along.  hope you found lots of inspiration and some new blogs to enjoy.  
here is a recap of our second week of the gifts from the heart series.


mollie from wild olive


stephanie from my secret garden


nicole from deliajude


annie from peppermint plum


andi from beautiful ordinary day

i want to give a very special thanks to the nine wonderful women who generously shared their gift ideas.  you guys rock!

find the recap of week one here.

join our gifts from the heart flickr group and add your own creations to the pool.  we would love to see what you come up with!

(the winner of nicole's giveaway can be found at the end of her post.) 

gifts from the heart, andi from beautiful ordinary day


our last gifts from the heart guest has brought us an excellent wrap-up to this series. andi, the creative soul behind beautiful ordinary day, and i had a "we should totally be friends" moment last fall.  i love these on-line connections!  her stunning photography and from-the-heart way with words won me over.  this post hit home big time.  i just really like andi and was excited to invite her over here for a bit.

do you want to see what she and her littles have to show us?


Hello! My name is Andi and I am from the blog Beautiful Ordinary Day. I feel so honored to be able to share on Annalea's blog today! Thank you, sweet friend!

I stumbled upon Annalea's blog a few months ago through Apartment Therapy and it quickly became one of my favorite reads. I love Annalea's heart- the way she loves God and her family so fiercely. And I am constantly inspired by the beautiful way she decorates her home and all the creative projects she comes up with. Oh, and we are both homeschooling our little ones, so it is always fun to hear about her adventures in that as well!

Today I am going to share a sweet little Valentine's project I did with my children this last week.


Clay heart necklaces!


This craft combines two of my kids' favorite things: baking + art.

First, you mix up the recipe for salt dough:

4 c. all-purpose flour
1 c. salt
1 1/2-2 c. water (I started with one cup, then added more as needed)

Any add-ins, like food coloring or glitter. (If you add food coloring, be prepared to add A LOT! I used almost half a bottle of red for ours and we ended up with pale pink dough when it dried!)

Mix everything together, and then knead for eight or so minutes until all the ingredients are combined and the dough is smooth.


If you have a standing mixer, it can knead the dough for you, which is great! But you could also do it pretty easily by hand.


When the dough is all smooth, it is ready to roll out!

One thing we learned the hard way is to not roll your dough out too thin. My daughter's hearts ended up breaking when they were dry because the clay was not thick enough. Such a bummer!


Once your hearts (or other shapes!) are cut out, use a straw or the eraser side of a pencil to put holes in your heart for the necklace to string through. Make sure that your holes are not too close to the top of the heart, or they will break!


Transfer your hearts to a baking sheet.

Now it is time to decorate your hearts! My kids wanted to use sequins + googly eyes (always a big hit around here for art projects!). You can find both sequins + googly eyes pretty expensively at craft stores like Michael's and Joann's.

Make sure that whatever you add to your heart is pressed firmly down in the dough. Anything that is not held tight will loosen up and fall out as the clay dries!


If you choose not to add embellishments, you can bake your hearts in the oven to dry them a little bit quicker. 200 degrees for as long as needed. But if you add anything special like googly eyes, you probably don't want to bake them because they might melt! So be prepared to wait a couple of days for them to air dry completely.


Once your hearts are dry, use yarn to string through the holes to make necklaces!

I was also hoping to add a layer of Modge Podge to our hearts as a sealer (they even have glitter Modge Podge!), but unfortunately I was out. I think some kind of sealer would help the hearts be a little bit stronger and less fragile.


Next time we make these, I would like to try painting them after they are dry rather than coloring them with food coloring. I would have loved for their color to be a little bit brighter and more vibrant.

These would also make easy and fun Christmas ornaments!

Thank you again so much Annalea for having me!

xo Andi

googly eyed heart necklaces?  that the littles get to make?  love it!  i think a kiddo friendly project is a great final guest post.  just in time for some weekend crafting for the whole family.  maybe even in time to make for monday?  thank you so much andi for sharing this sweet project with us.  audrey is an adorable necklace model.

now go hang out at andi's for awhile.  grab a yummy drink, get comfy, and stay awhile.  i really think you'll like her too.  (and don't miss out on her old blog tales of a crafty mama for more goodness.)

gifts from the heart, annie from peppermint plum


we are down to our final two gifts from the heart posts!  i hope you have been inspired by these lovely ladies.  i would love to see your creations.  please add them to the new gifts from the heart flickr group.  

today's guest, annie of peppermint plum, has for sure been a source of inspiration to me.  the blog she shares with sister tammy may be new, but i have had my eye on annie's work for quite some time via flickr.  i mega heart her embroidery.  aren't they just fantastic?  one of them was even chosen for the whipup 2011 calendar.  very cool!

some of my top gift giving picks from the peppermint plum projects include the sewn paper candy pouches, the garnished gift boxes, and the printable valentine's tags.  i love that they all use everyday items in new and creative ways.

now take a look at what annie has for us today. . . 


Hello lovely readers!
My name is Annie and I am a co-author of the blog Peppermint Plum. My sister, Tammy, and I have always had a love of crafts and home décor and just being overall creative! We decided recently that sharing our creations and ideas with the blogging world would be a great way for us to not only pass along our own ideas, but also to see and interact with some of the amazingly talented people who also choose to share their love of life with the world.

Annalea Hart is just one of those people.

We are thrilled to be asked to take part in her “Gifts From The Heart” guest-hosting series and I am happy to share this crafty tutorial with all of you!
 
Altered Coaster Valentine Art


Supplies you will need:


* coasters
* ribbon
* patterned cardstock paper
* vinyl or sticker words/images
* glue stick
* glue gun
* scissors
* sanding block/sandpaper


Start by wiping off the smooth face of the coasters you are going to use.

If you get them from a thrift store like I did, you will want to clean them thoroughly before handling them.


Run the glue stick all over the top of the coaster, making sure to get all of the corner edges as well.


Press the coasters onto the back of the patterned paper and hold tightly until the glue starts to dry.  Press all around the edges to ensure a good, tight seal.


Once the glue is dry, cut around each coaster and start to sand the edges of the paper off.  You will want to do this over a bag or the garbage, as the sanding causes lots of paper dust.


While sanding, you can rough-up the edges as well.  If your paper has a white core, it will end up looking like these.  If you want a darker edge, now is the time to ink, chalk or sponge-paint around the edges to get the look you want.


Decide where you want to add your vinyl/stickers and apply them to the coasters.


Now, lay out your ribbon and decide where you want to hot glue the coasters.

If your ribbon is plain, this wont matter.  Since I was using polka-dot ribbon, I wanted to make sure that the dots were spaced evenly underneath and in the middle of the coasters.


Use the hot glue gun to glue the coasters to the ribbon.
Finish the bottom end by cutting out a V-shape and make the top into any hanging shape you like best. Be sure to cut the ends of the tied ribbon in a V-shape as well, as it adds detail and the finishing touch.


Once everything is glued and tied and cut, it is ready to hang!


This project can be altered in so many ways to make it exactly how you like it!

You can change the colors, the paper, the ribbon, the words -- anything for any occasion.


I made a second version with the letters L O V E, so I could keep it hanging in my house all year long!


I chose yellow and white paper with black and white polka-dot ribbon to match the rest of the décor in my house.

This really is a fun and quick craft and is simple enough that your kids can help, or even make their own!

I hope you enjoy making your own Altered Coaster Valentine Art to add a little extra love to your home.

And, thank you again to Annalea for this opportunity to share it with you!

Go.... be creative!
-Annie


thank you so much annie for sharing this fun project! i like that there are so many ways to personalize this. and since one of my kiddos went through a coloring on coasters phase last year, i definitely have some around my house ready to upgrade.

be sure to check out annie and tammy's blog peppermint plum for great gift ideas and much much more.  and don't forget to visit annie's etsy shop jammer sage. how can you resist these little guys?

gifts from the heart, nicole from deliajude


i am delighted to introduce you to nicole from deliajude as today's guest.  when we met last year, i felt a near instant connection.  when she writes i feel like she plucked the thoughts out of my head - phrasings, word choices and all.  it is very neat when that happens.  although we share many interests, our lives are very different.  yet i continuously feel a solidarity in our journeys as wives, mamas and followers of Jesus.  there is a lot more i could say here, but i think you should go read her stuff and see what i mean.  here is a sampling of places to start: non-resolutions, today's letters, scientific seventh birthday, and deafness.

now let's see what goodness nicole has for us today. . .

What a honor to be here today. Isn't this a fantastic series...so many new blogs to read and tutorials to try. I suppose I ought to tell you all where I met Annalea... about a year ago over on SCL, I read a comment she made in which I linked to ourhartbeat and the rest, they say, is history. Web connections can create amazing friendships and communities for which I am grateful. Thank you Annalea for counting me in your number for this series.

Okay, let me start by saying, I love garlands, buntings, pennants, basically all things festive banner like. Lately I have been thinking about the bible verse "His banner over me is love" and how I can tie that verse into my garland love. In fact, I pondered long and hard about how I can incorporate those ideas. This is what I came up with...a mini piece of art with a banner.


First, I used my handy dandy heart punch (fiskars) and punched out 10 hearts from this gorgeous pink glitter paper (found at paper-source).

Then, I stitched the hearts together through my sewing machine.

I tried to create this project with what I have on hand...which is a surprisingly large stash for an alarmingly small storage area (my son's closet).

Using an 8x10 canvas and painted it with a chocolate color acrylic paint...a really thick and swirly layer of paint to create a textural effect on the canvas.


While the canvas was still wet I gently placed the sewn heart garland over the paint and pushed it down with my fingers...using the paint as the glue.

Of course the paint needed extra time to dry due to the thick swirls...which gave me more time to think about how to add the scripture.


The next day I printed out the bible verse from Song of Solomon 2 v4 "His banner over me is Love"...a cool font always helps!

Using a sharp knife and ruler, I trimmed the quote down to reasonable banner size and shape.


Using a super strong double stick tape I adhered the banner to the canvas...If I had been prepared ahead of time I would have attached the banner the same way I did with the glittered heart garland, using the wet paint as a glue....which is what you should do if you recreate this craft.


The final look is textural, unfussy and a daily reminder. A perfect gift.

In fact I think I will send it to my mom...she is not a hanging garland kind of mom but she loves handmade gifts, especially ones from the heart.


dear nicole, thank you for clicking over to my blog last year and introducing yourself.  thank you for your friendship this year.  thank you for this guest post and sharing your gift from the heart. ~a


did i mention you can find nicole on etsy at deliajude the shoppe?  she makes the sweetest garlands and cards from found materials, as well as selling supplies for your crafting needs.   

nicole would like to offer one of you a three month subscription to her garland of the month club.  isn't that sweet?   

the winner is. . .
alisa joy: i love garlands. love 'em! love 'em! love 'em!
congrats alisa joy!  please e-mail me at annalea_hart{at}yahoo{dot}com so i can forward your information to nicole.

gifts from the heart, stephanie from my secret garden


today's guest is unique in that i actually have seen her beautiful face in person.  yep.  i actually know her in "real-life"! (but, really, i consider blogland real-life too.)  our families belong to the same church and are on mission at the university together.  our daughters play together.  we have traveled to honduras as part of a missions team together.  and, together, we share a love for making beautiful things from what we find around us.   

stephanie uses her blog, my secret garden, to share her diverse life and interests.  you can find great ideas for pretty and simple home decor.  stephanie if also passionate about healthy, tasty food.  (maybe you can share that modified brownie mix recipe with us sometime?)  and she is one of those girls who make every outfit look fabulous.  i look forward to her fashion posts.  (and she sews up some great stuff sans patterns.)  the following tutorial reflects her great style and creativity.  let's check it out. . .


Hello! I am really honored to be guest posting for you all today. I have the privilege of knowing Annalea- she actually lives in my neighborhood! And let me tell you, she is just as beautiful and kind and creative as her blog.

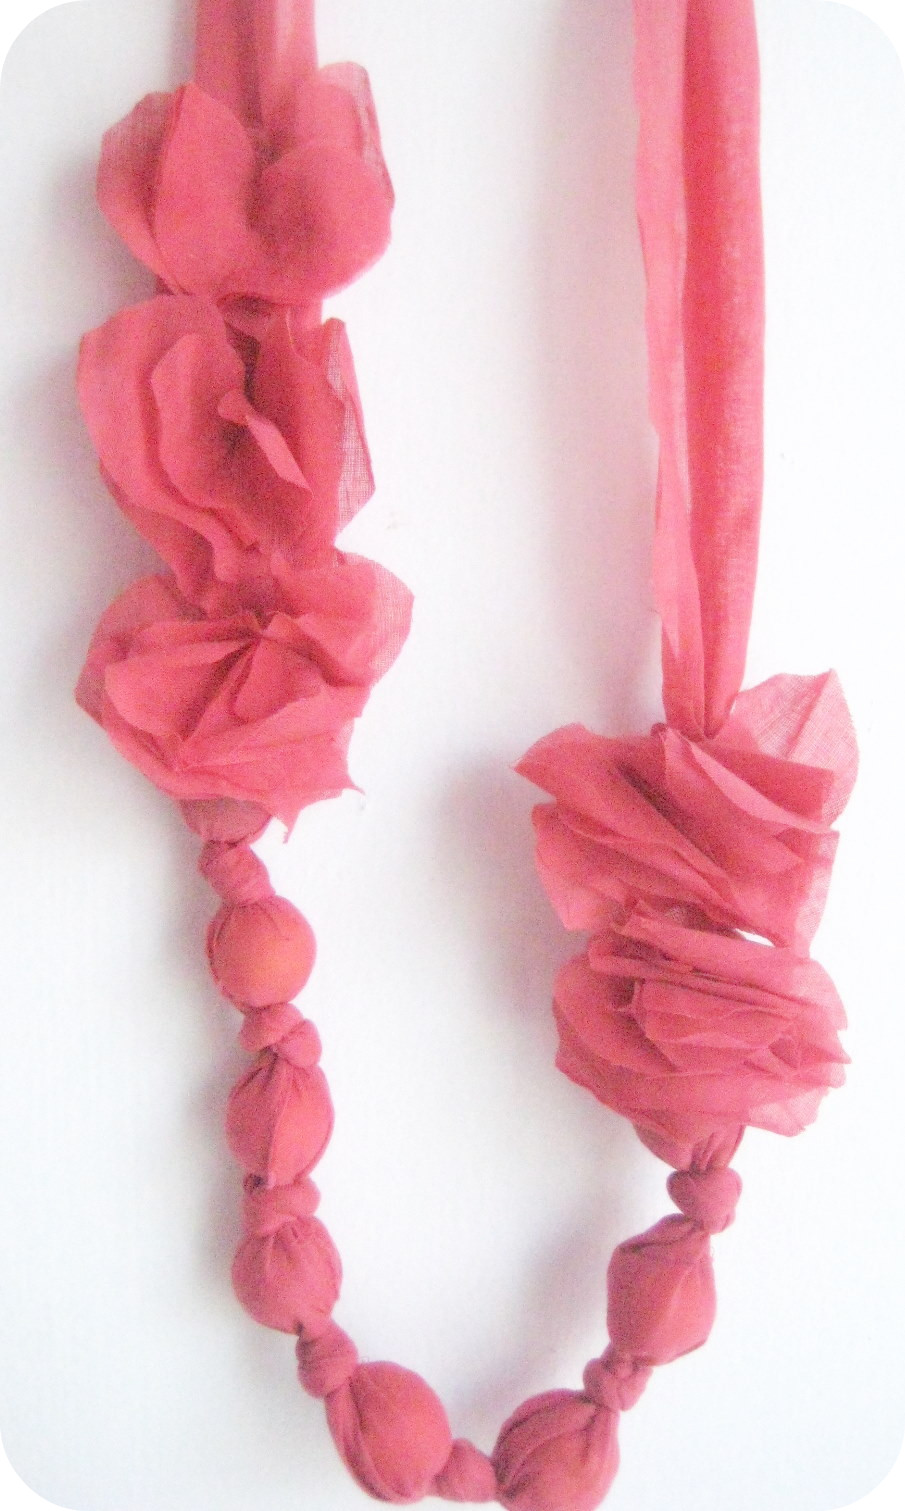
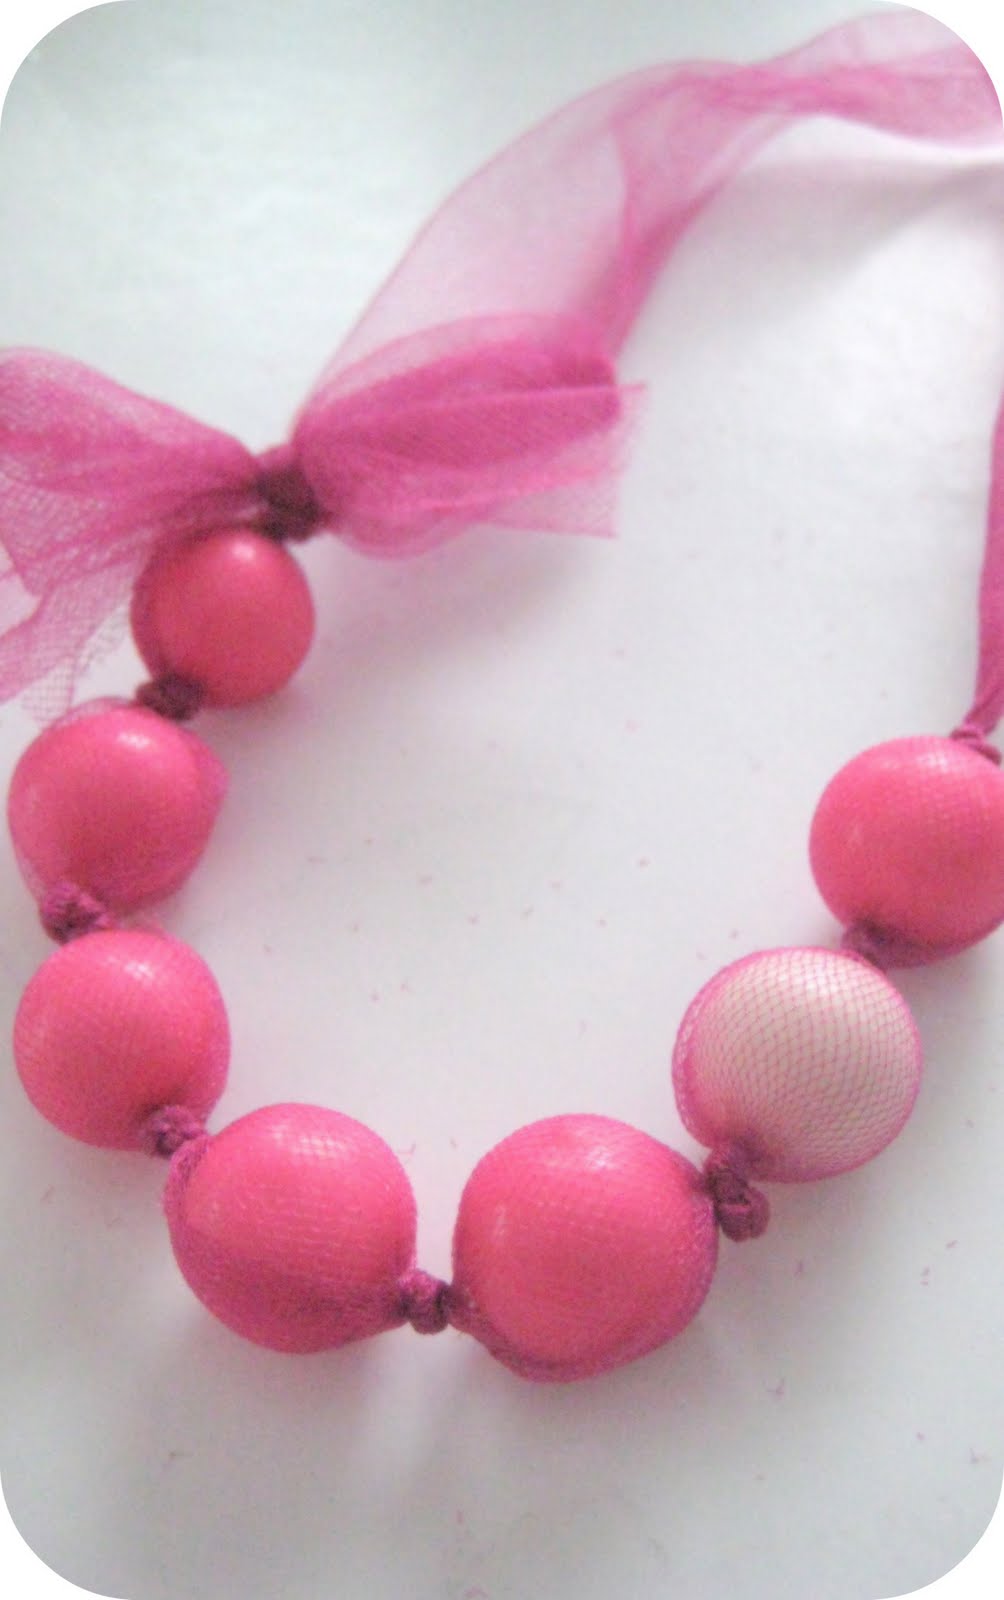
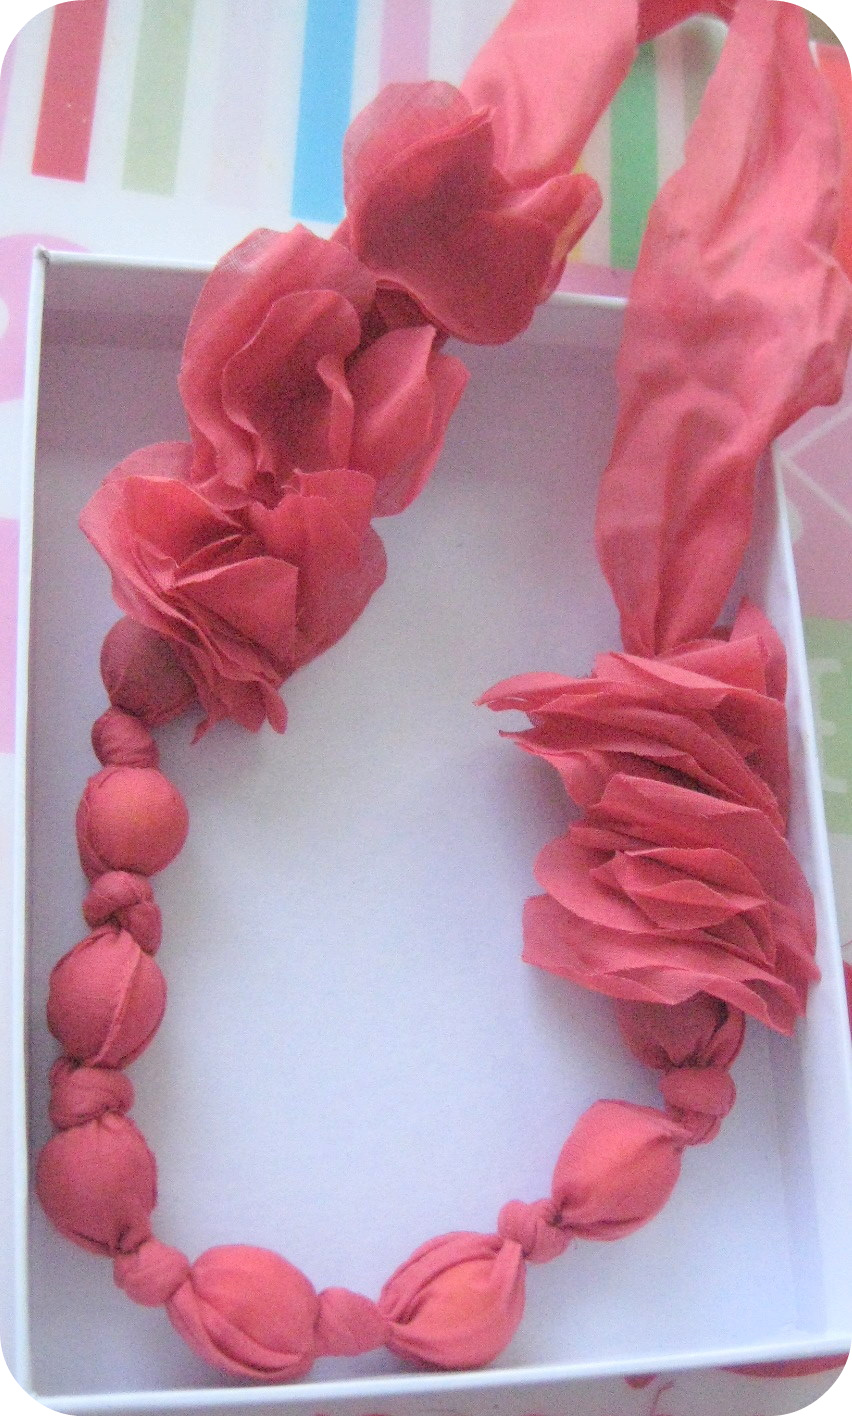
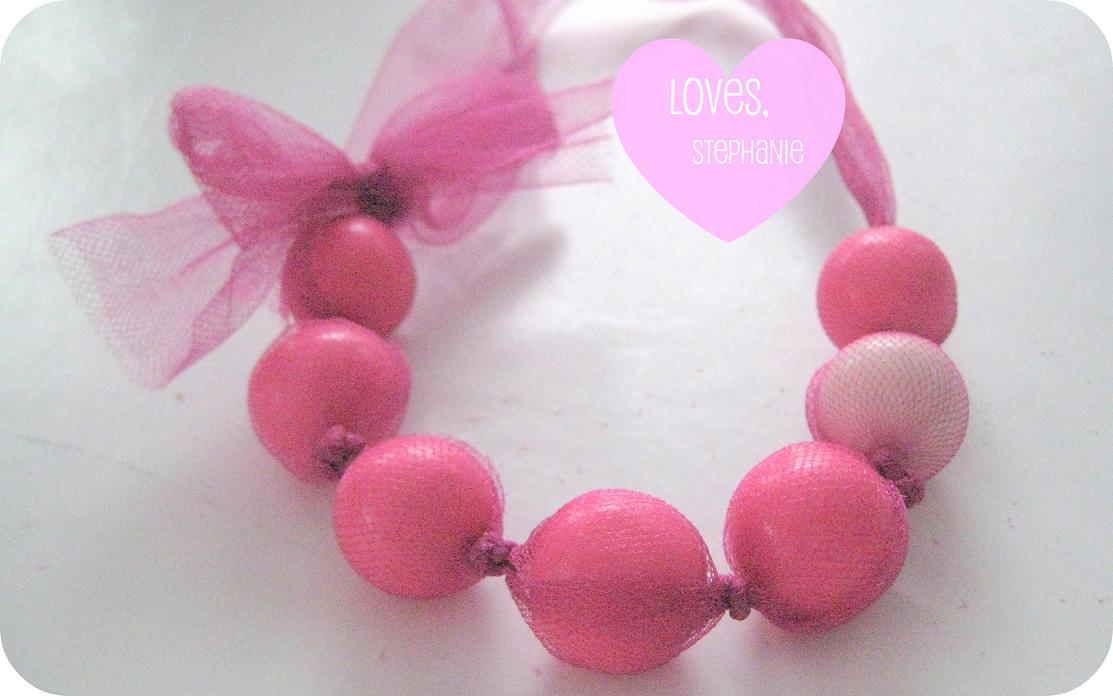
You might have seen a necklace like this {a gift from my sister} at Ruche or Anthropologie. I love it’s casual flare, and how it easily adds ruffles and flowers to any outfit. So I decided to make one! But I added a little sugar to it- gumballs! There are two versions: one for a sister, mom, or friend, and one for kids. Here we go:

Sweetheart and Bubble Love


We’ll start with the Bubble Love.

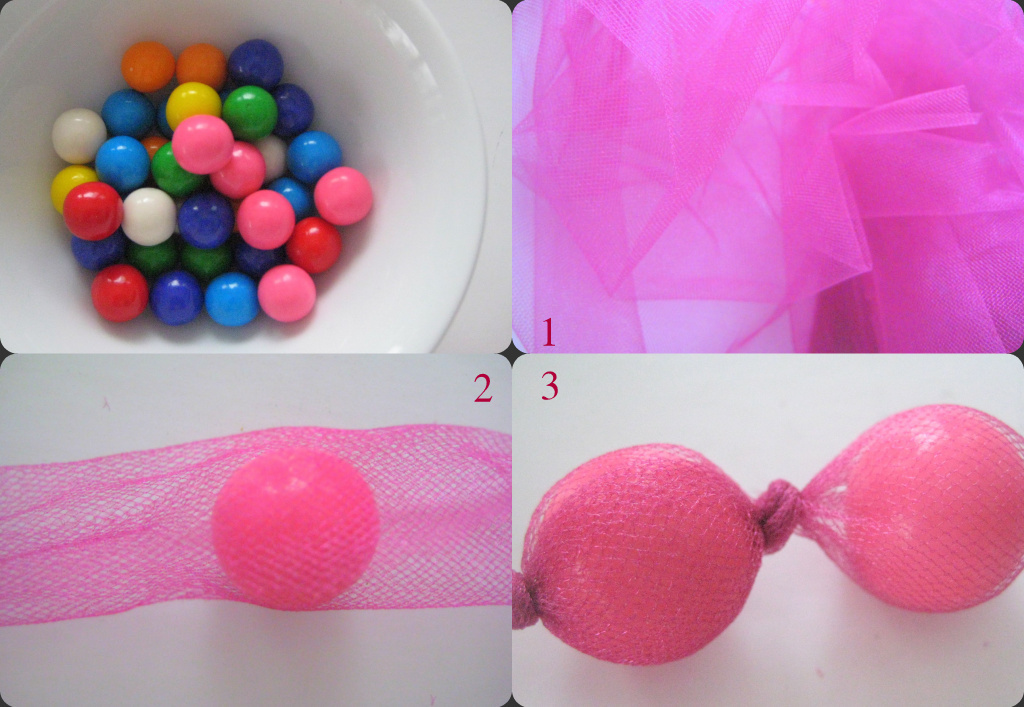
All you need is gumballs, scraps of lightweight fabric, and a needle and thread.


{Step 1} Cut a 2 inch strip of fabric {i used tulle so you can see the gumballs} as long as you want your necklace, plus extra for tying {mine is about 18 inches}

{Step 2} Wrap one gumball into the fabric

{Step 3} Tie a tight knot at each end of the gumball, add another, repeat, repeat, repeat for 7 or 8 gumballs


{Step 4} Tie around neck, done! So easy and very tempting for a 3 year old sugar baby.

The next version takes a little longer, but not much.

Sweetheart


{Step 1} Cut out a stack of about 30 hearts

{Step 2} separate into 5 piles with 6 hearts each and tack together with a single stitch. I used blue thread so you can see the stitch better, but it would be better to use matching thread

{Step 3} Tie gumball chain just like Bubble Love.

{Step 4} Stitch the heart piles in place on edges of necklace, 3 on one side, 2 opposite

{Step 5} Tie edges together and you’re done!


I used gumballs in this, but if you want a more permanent necklace, use plastic or wooden beads. To make it more secure, sew the edges of the fabric together so the beads won’t fall out.


thank you so much steph for giving us two fabulous tutorials!  how sweet would this matching set be for a mama and daughter?  or an aunt and niece?  or a grandma and granddaughter?  love it.  i also think bubble love would be a great daddy-made gift for his little sweetheart(s).  i know i will be showing jesse this one.

stephanie, i am so glad we get to be neighbors.  and love that we are in community together as sisters in Christ.  even when i don't see you for weeks, i get to read and connect with you on-line.  yay for blogs!  

now go grab a yummy drink and spend some time over at my secret garden.  you'll find a beautiful family and lovely lady with so much to share.